Tuesday, July 30, 2013

Vocabulary Terror

Bf: My friend says I look like Kang Gary (from Running Man) when I wear the cap and have my eyes half closed

Me: Really?

Bf: Yeah. And I was like "Aiya, don't flatten me la!"

*pause*

Me: You mean flatter?

Bf: Um... yeah

Me: Well if your face was flattened you sure look like him!

Friday, July 26, 2013

Victor's Kitchen & Kooka Cafe

After learning our lesson from last time (greeted by 10% of the total menu when we visited Victor's Kitchen at 3.30pm on a weekday), we decided to reach there as early as we can. We reached at 11am which was quite a close shave before the lunch crowd comes in at 11.45am. I didn't take any photos cos I was busy eating from the giddy bus ride and an empty stomach - I cannot take long bus rides without proper breakfast. 

By the time we got there, 40% of the full menu was cancelled out so it was better than last time. We ordered minced meat porridge with dried vegetables, siew mai, har gao, deep fried prawn dumpling, fried beancurd skin wrapped with prawns, hot chrysanthemun tea and HK iced tea. The names which are bolded are the yummy ones. 

The porridge was a little more watery than I had expected for a Cantonese chok... something like a crossover between Teochew porridge and Cantonese chok. It is good in a way that I still have space for other foods served later. As compared to a Cantonese chok, the one opposite my house, it has a clean aftertaste and doesn't stick onto the mouth like a sticky porridge would. A sticky porridge tends to make me thirsty - maybe the MSG? - and I'll end up full by water. Overall, the porridge is a good "base" to go along with the heavy dimsums. 

I didn't like the siew mai and fried beancurd skin wrapped with prawns because there is this "pork taste" that leaves me jelak and turned off after a while. I love the har gao and deep fried prawn dumpling (or wanton) cos it is so full with prawns and filled with a lot less pork than the two dishes I mentioned earlier. Don't expect the fried dumplings to be half of your palm size because less is more and you savour it... not gobble it! Chrysanthemun tea is alright and I haven't got to drink HK iced tea cos I was busy eating.

Directions to Victor's Kitchen: Take 147 (leaving Hougang Bus Interchange) and sit and relax until you see Hotel Ibis Bencoolen, alight at the stop when the bus turns to the right to alight at Sunshine Plaza. If you are reaching there by foot, locate Hotel Ibis and you will see Sunshine Plaza. 

From Victor's Kitchen, my trusty Google Map led me to Kooka Cafe along Purvis Street. It took us a 15 minute walk to locate it and to digest our oily brunch. Kooka cafe is a relaxing, dim-litted cafe that serves light brunch, pastries and coffee. The cutleries and iced water are self-service and they sell art pieces that are hung on the walls. 

I ordered Pear & Almond Tart and Long Black while Xiaoli ordered Blueberry Cheesecake (MUST TRY) and Homemade Iced Tea.

Blueberry Cheesecake and Homemade Iced Tea. Credits to Xiao Li

Blueberry Cheesecake was light and its accompaniment of blueberries just pop in your mouth! Have it with some fresh cream and it tastes so amazing. I could have this all by myself and not feel sick at all.

Pear & Almond Tart
For your coming visit to Kooka Cafe, if you had a heavy lunch or not, you must try the Pear & Almond Tart. It is light and not diabetically-sweet. Just remember to eat with the fresh cream SPARINGLY otherwise you will start missing them :(
Long Black on top right corner with delicious Lemon Biscuit

I have never loved fresh cream so much before.

Thursday, July 25, 2013

Trial Run for Party Makeup

My makeup skills hadn't been improving lately and I thought it was time to learn to do a proper makeup for my party. I learned from this YouTuber, frmheadtotoe, as she has monolids and slight hooded lids like mine.


I skipped the mascara and false eyelashes because I was left with a mascara I got 2 years ago and falsies just irritate the tear out of my eyes. I can't stop blinking and tearing up without feeling like there's a toothpick poking my eyelids!

Armed with my 88 neutral colour eyeshadow palette, I believed that I could get any similar colours as she had used in her Urban Decay Naked Palette. After a painful 30 minute, I realize that only the dark shimmery brown colour wasn't available in the set and I had to use the Maybelline Eyestudio eyeshadows in Autumn Spirit. 

Close enough!
This was the closest I could get. It was easier to do the left side as the eyelids were considered to be double eyelids but they are the not obvious type. The right eyelids are completely hooded lids so both eyes would end up with eyeliners of different thickness.

Downside was that my desk light is yellow coloured so the eyeshadows end up looking a little darker than it would have been in the video.

Oh well, good job Hui Yi! :)

Party DIY: Tissue Paper Pom Poms

The long-awaited tissue paper pom poms have finally completed and I have mastered it well enough to write up a tutorial - original source taken from www.bohoweddings.com but adjusted to the materials I can get my hands on. 

I have experimented with crepe paper and given its filmsy structure, it is rather difficult to handle during flipping and folding concertina style and especially when fanning out individual sheets. I would recommended crepe paper for those who likes texture on their pom poms, otherwise - considering that only the shape and unruliness of the papers will be noticed - I would still go for tissue paper.

Also, remember to do this without switching on the fan or at any place with wind. Even the slightest breeze can blow the papers over and you will have a hard time arranging them back together. 

Be generous with the length of twine and nylon string during cutting as it is always easier to handle longer strings than realizing you need 1cm more halfway through.

Materials you will need:
  • 8 sheets of coloured tissue paper (about $3.20 each from Art Friend)
  • Garden twine (one ball for about $3.30 from Art Friend)
  • Tough paper scissors
  • Nylon bead strings (from Daiso)
  • Long ruler
  • Smooth and flat table/any surface (I used the floor)

STEP 1. I am doing a dual colour paper pom pom to create gradient of blue by taking 2 sheets of baby blue tissue papers and 6 sheets of normal blue colour. Using a long ruler, measure a 2" gap and fold across. You can use the ruler to press down the sides gently or use your hand (shown in the 4th grid). Continue folding while making sure that the gap stays consistent.


You would have reached this stage where there is only 1" gap left to fold. Well... obviously I didn't intend to calculate the gap width using the given dimensions (20" x 26") so I gauged 2" would be good to have a fan large enough. Back to this situation; how do I rectify it? There's no need to... just go ahead and fold over! Who would notice the gap once you have fanned out the sheets and whose counting anyway?


STEP 2. Find the centre and use the long ruler to anchor nicely while you fold the left portion to the other side. The ruler helps to keep things steady and leave a faint mark so the twine can be tied over to hold the fan together. I did a double knot with the first one holding the fan a little taut, then the second knot secures the first knot.


STEP 3. Use the nylon string to loop under the twine and tie double knots at one end. Adjust the length of the string to the height you want to suspend your pom pom. 

STEP 4. I almost forgot this step! Cut a quadrant at both ends of the fan and make sure the ends are cut cleanly so as to enable easy fanning out. For the prototype, I fanned 4 sheets of paper gently on one side and did the same for the other side. 


Don't worry about squishing the pom pom; they'll do just fine. Most important part is to cover the bottom part by fanning the sheets straighter because you don't want your guests to see the "butt" of the pom pom.


STEP 5. I used the plastic bags which used to contain the tissue paper to store my "fans" so it can be protected while I bring it to my party venue next week. Neat way to recycle huh?


Party DIY: Perfect Circles

Who am I kidding to post DIY tutorials when I know that nobody visits my blog? Anyway, I wanna share something very useful for amateurs dabbing onto party crafts materials. Yes, yours sincerely.

My 21st birthday party is coming up next Saturday and I havr started planning the decorations a month before. I know right... so kiasu. The most important decoration in a party is the birthday banner. So I decided to drop by the two shops along Middle Road that sells party decorations. Guess what? They are horrid!!! *bloodcurdling scream* The designs are either for 12 and below or baby showers or wedding anniversaries. The only decent ones were in pastel colours and silver but the words are "IT'S A BOY/GIRL!" or "HAPPY 25TH ANNIVERSARY". I decided to give up and invest more money on a prettier banner through DIY.


STEP 1. Buy scrapbook papers (12" x 12") of a light background that can be compatible with black or greyish black ink. The colours can be yellow  beige, light blue or any light shade of the colour of your birthday theme. I chose yellow for the banner to go along with black fonts.

Depending on the length of your banner - I go by each alphabet - buy one paper for every 4 alphabets. My banner is "HAPPY 21ST BIRTHDAY" so I bought 4 pieces with the "st" representing one alphabet.

Note: Inkjet printers are unable to print WHITE INK. I heard it's a great challenge for most printers and can only be done by really expensive ones. Unless you have a coloured background and place white fonts over it - the printer will regard it as an empty space.

STEP 2. Get ready a pair of scissors that can handle the thickness of scrapbook paper. Wait... Do you have a box of set squares back in secondary school? If yes, you are (damn) lucky because there is no need to buy an 3 inch circular craft punch! Use the item that you use to draw arcs back in school days.

STEP 3. If you have a packet of photo paper lying around (4" x 6"), pick one out as your template. The packet should state the photo paper dimensions. Trace out the template on the side of the scrapbook paper you wish to use so it can guide you during cutting. My arrangement is two vertical rectangles side by side starting from the upper left corner; one horizontal rectangle at bottom right corner and one vertical drawn right beside it. You should be able to draw 4 rectangles per paper.

STEP 4. Cut out all rectangles and leave them aside. Choose the font you want and play around in Microsoft Word to see how they look like. 
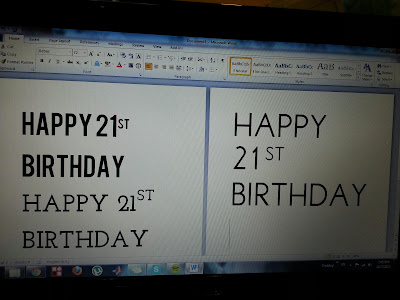
Fonts used: Bebas, Josefin Slab, Libby

Once you have finalized, select Print > 4" x 6". Go back to Home and you should see that the document size had changed. Using one page only, type the first letter of your alphabet and enlarge the font such that it is centralized. This is a test run so you can use the photo paper (previously used as a template) to print out a sample.
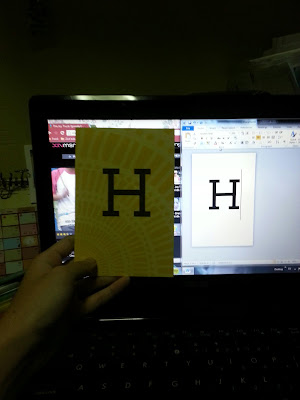
Centre alignment with font size 200 using Josefin Slab

STEP 5. Once the photo is done, use the sharp part of the set square item to anchor at the middle of the alphabet. Adjust the gap between your anchor and pencil and see if a perfect circle can be drawn within the paper. 

Don't worry if you can't see it because the pencil doesn't work on glossy photo paper but works on normal paper.

Remember NOT to adjust the gap anymore as you will need it for many many more alphabets.

If the font is too big or a perfect circle cannot be drawn, go back and adjust and reload a new photo paper or any 4" x 6" paper as your sample.

STEP 6. PRINT OUT EVERY ALPHABET! Draw circles - the line should be drawn dark enough for you to cut - on each alphabet after locating the centre point. Cut out everything and tie them up together by glueing with ribbon or garden twine!

STEP 7 (optional). If you would like a fancy banner, use some fabric tape or crotchet or lace tapes and go over the sides.

P/S: If the ink appear light, fill them in with black marker but be very careful not to fill over.

Good luck! :)

Tuesday, July 23, 2013

Fika and Ah Chew

It has been almost a year since I last blogged! Many thanks to the busy semester in school and thank goodness for completing junior year. These two weeks was given for us to fully relax, rejuvenate and recharge for the upcoming senior year... then I'll graduate at the end of next year!
Let's get onto food review(s) shall we?
The usual group, a.k.a. Julie & Co., 10 of us went to Fika to celebrate Elijah's 21st birthday over dinner.
Happy birthday Elijah!
Julie said that everyone would have to dress fancy since we are eating at a fancy place but I guess everyone dressed as smart casual except for her. Here's my take on fancy NAILS. No outfit photos 'cos I'm not an OOTD (Outfit Of The Day) person.


As usual, everyone was running late and we're thankful, yet very embarrassed, that Fika opened the second storey seats just for us 'cos we are a big group and first floor was rather crammed. At first impression I thought Fika would be decorated with a lot of messy paisley prints like a cottage wooden house in Sweden but I had totally forgotten that IKEA is from Sweden too and it turned out that the restaurant was washed in white, simple designs yet looked very cosy and homely to be at. It is definitely a place to chill out and have good (and big portions) of Swedish food.
Five of us arrived first so we went ahead to order food. Everyone, except me, are able to eat beef so they ordered Swedish Homemade Meatballs ($19.50) and Swedish Pasta Bake ($17.90) to share. I can only drool at the generous amount of cheese in the baked pasta (no photo! :( )but I was turned off immediately when the oil dripped onto my napkin and turned into a light yellow colour (GASP! THE OIL!).


Swedish Homemade Meatballs. Credits to Fika Cafe
They serve large portions, usually meant to be shared if a group of girls are dining for the first time; quality is food is superb; and the ambience is calming. Most of us ordered crepes as recommended by Ziana and the food was so yummy that money was well spent! I ordered Skagen Crepe ($17.90) and its filling is a mix of Swedish fresh water shrimps, smoked salmon, fresh dill, mayonnaise and topped with fish roe. Don't be fooled by the word "shrimps" into thinking that they are hei bi (dried shrimps) 'cos they are very succulent!


Swedish Homemade Meatballs. Credits to Fika Cafe
Since it's my first time trying Swedish food and the crepe I ordered looked very similar to a food that can be found commonly in sushi shops, I would automatically compare to it right? The filling tastes similar to the crabstick or lobster salad/mayo sushi you get for $1.60 outside but the mayonnaise used in the crepe isn't thick and the shrimps give a firm bite - succulent - that doesn't make me feel jelak after finishing one portion of the crepe.


Skagen crepe
See that bunch of red roes on top of the crepe? It tastes so much better than the fish roe you get at sushi shop... I mean isn't it obvious? You get the food quality for the price you pay. I would say the roe is a little saltier as compared to the orange fish/shrimp roe used in sushi and it has to be savoured bit by bit.
If you are a beef-lover - and this advice is coming from a person who doesn't eat beef - you must try the Roast Beef Crepe than the Pytt i Panna (diced beef with potatoes, onions, egg and beetroot slices) cos they were all raving about it. Downside is that the salad dressing was a tad oily for me and I would prefer if they had replaced it with vinaigrette to make it more appetizing. Their desserts looked yummy but I haven't had the chance to try them and might as well save up since the birthday boy is treating us to dessert!
Overall, I would recommend friends to try this place and I would come back for the good service and savoury crepes and definitely the dessert! Money is well-spent :)
Directions to Fika (Beach Road): From Bugis MRT station, exit until you see BHG. Walk along Victoria St, walk through Golden Landmark, cross the road to Arab St and walk all the way to the end. You should see Fika at the shophouses on your left.
Next, we headed to Ah Chew's dessert at Liang Seah St and gossiped away.


Deciding what's nice

Most of us ordered Grass Jelly with Watermelon/Longan/Lychee 'cos we were rather full to our throat from Fika. It was a refreshing dessert with the grass jelly not-so sweet and has a firm bite and instead the sweetness was contributed by the syrup and watermelon. I can't remember the price exactly but I do remember that prices start from $2.80 and can go as high as $8.80 for Hashima.


Grass jelly with watermelon
Directions to Ah Chew's dessert: From Mos Burger at Bugis Junction, jaywalk (whoops but be very careful) to Liang Seah St until you see Yu Kee Duck Rice. Walk along the shophouses on the right side until you see the signboard.

Fabulous Red Velvet Cake

I finally got the chance to visit Fabulous Baker Boy for their famous red velvet cake! *does a little happy dance* Today was filled with great food and great company with Charlotte, my pretty and sweet friend from Changi Youth Ambassadors back in poly days. Ah... I miss the times spent at airport so much though it felt more like an 3.5 hour torture by being a mobile information counter. 
Apple Cider Cake, Ab Fab Red Velvet Cake & Garlic Fries
Cakes were going at $7.50 per slice and there are snack foods to order. We arrived at about 12.30pm - the glaring sun was unbearable but the open space concept made great ventilation - and ordered Apple Cider Cake, Garlic Fries ($9.50) and Red Velvet Cake. Charlotte wanted to try the Nutty Monkey but we wanted to try more flavours and the staff said the Nutty Monkey cake is a tad heavy.

The drinks and garlic fries were served first, followed by the cakes. The garlic fries were normal fries garnished with garlic bits and salt and pepper and I would say it taste okay... not something I would order the next time I go there because it doesn't seem to be worth the money. Apple cider cake was rather light and refreshing after I had so many bites of the red velvet cake.

Oh my goodness... you CANNOT COMPARE the red velvet cake to the one I eat at Coffee Bean. The cake is so fluffy and soft and as much as I thought that a layer of chocolate would add immense sweetness and chocolate overload to the already sweet cake, it was balanced out nicely! Coffee Bean red velvet cakes have crumbly texture that leaves quite a mess after eating. 

We sat there and chat over a few hours. Overall it is a quiet - not so quiet when a bunch of aunties sat next to our table - and relaxing place to be. You can pick the sofa seats too but I wouldn't recommend that during lunch hours cos those seats are close to the sun.

Directions to Fabulous Baker Boy: From Clarke Quay MRT station, walk to the mrt exit where you will see Cheers. Walk across the bridge, cross road to MCYS building, walk along the path until you see "The Foothills" entrance. Enter from there and walk further up to find Fabulous Baker Boy.